|

|
|
|
Most signals, as well as displaying an aspect, are provided with signs or indicators that convey additional information to traincrews. Typically, this may include the signal number, identification of specific kinds of signals, and information that relates to the provision and usage of a telephone or call plunger. The traincrew can use this information to determine the correct course of action according to the circumstances, for example when their train is detained at the signal or in the event that the signal shows no aspect because of failure.
The majority of signs affixed to signal posts or near signals primarily concern drivers of trains detained at the signal, awaiting its clearance. In the old Rule Book, Rule 55 outlined the actions to be taken upon the detention of trains on running lines. This began:
"When a train has been brought to a stand owing to a stop signal being at Danger the Driver must sound the engine whistle, and, if still detained, the Guard, Shunter or Fireman must go to the signal box and remind the Signalman of the position of the train..."
|
At some locations, the walk from the signal to the signal box would have been time consuming or hazardous. This led the London & North Western Railway to devise the 'fireman's call box'. When the fireman pressed a plunger at the call box, an indicator in the signal box was operated. If the equipment had functioned correctly, a bell rang in the call box, and the fireman was exempt from going to the signal box. The equipment was trialled in 1907, proved to be successful and rapidly spread to other parts of the LNWR. To indicate the presence of the fireman's call box, an illuminated sign with the appropriate words was provided [9.1]. |
|
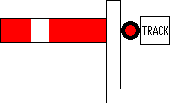
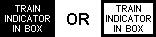
Traincrews were exempt from carrying out the requirements of Rule 55 at certain signals on account of there being a track circuit or other form of train protection that automatically indicated the presence of the train to the signalman. Some companies indicated where this exemption applied by means of an illuminated sign fixed at or near the signal concerned. The signs on the LNWR displayed the words "track circuit" [9.2], while those on the North Staffordshire Railway had just the word "track" [9.3]. The Great Western Railway's signs were worded "train indicator in box" [9.4], while the Lancashire & Yorkshire Railway's signs explicitly stated "Rule 55 exempt" [9.5].
 |
 |
|
[9.2] "Track Circuit" Sign.
Area: LNWR Usage: Medium Status: Historical |
[9.3] "Track" Sign.
Area: NSR Usage: Medium Status: Historical |
|---|---|
 |
 |
|
[9.4] "Train Indicator in Box" Sign.
Area: GWR Usage: Medium Status: Historical |
[9.5] "Rule 55 Exempt" Sign.
Area: L&YR Usage: Medium Status: Historical |
The signs described above were illuminated by a separate lamp provided in addition to the signal lamp. From 1912, the Midland Railway avoided the provision of separate lamps by fitting non-illuminated plates instead. The 'D' sign (so called because of its shape) [9.6] was introduced to denote that a fireman's call plunger was provided for the driver or fireman to remind the signalman of the presence of the train. W C Acfield designed the 'diamond' sign (actually an elongated hexagon) [9.7], which indicated exemption from Rule 55.
 |
 |
|
[9.6] 'D' Sign.
Area: Mid.R (subsequently LMS and LNER) Usage: High Status: Historical |
[9.7] Diamond Sign.

Area: Mid.R (subsequently All Areas) Usage: High Status: Current |
|---|
Some of the other companies introduced their own variants of the 'D' sign and diamond sign. The North Eastern Railway's 'D' signs were shaped like a ring [9.8]. On the Caledonian Railway, the presence of a track circuit was denoted by an indicator, in the shape of an elongated hexagon, fitted to the signal post. A purple light was displayed in the centre at night [9.9].
 |
 |
|
[9.8] 'D' Sign.
Area: NER Usage: Medium Status: Historical |
[9.9] Track Circuit Indicator.
Area: Cal.R Usage: Low Status: Historical |
|---|
|
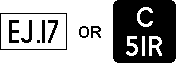
Since the advent of power signalling, it has been common practice for main and shunting signals within the areas concerned to be identified by plates bearing their identification. Signal identification plates vary in detail but are generally square or rectangular in shape and have either black characters on a white background or white characters on a black background [9.10]. Plates with a white background predominated at first, although the North Eastern Area of the LNER and its successor, the North Eastern Region of British Railways, favoured a black background. BR initially standardised on a white background for all signal identification plates in 1970 but then switched to black backgrounds in 1974. Current practice, originating from 1992, is to fit identification plates with a black background to all signals apart from shunting signals, which should have plates with a white background. Since the early 21st century, the provision of identification plates on signals in mechanically signalled areas has become commonplace; before then, such signals were usually referred to in driver/signalman communications by name only (e.g. "Up Outer Home"). |
|
Although they could be situated miles from the nearest signal box, the earliest automatic signals had not normally been provided with signal post telephones. The 'stop and proceed' rule was introduced in an effort to keep trains moving in the event of failure preventing an automatic signal from showing a 'proceed' aspect. This rule permitted drivers to pass an automatic signal displaying a 'danger' aspect on their own authority after waiting for a prescribed number of minutes and to proceed cautiously towards the next signal. Before applying the rule at any signal, drivers had to ascertain that it worked automatically. When the LNER installed colour light signals between London Marylebone and Neasden in 1923, the automatic signals were identified by a large letter "A" on the lower part of an elongated signal identification plate [9.11]. The 'stop and proceed' rule could also apply to semi-automatic signals while they were working automatically. On the Marylebone - Neasden scheme, semi-automatic signals had illuminated "A" signs [9.12], illuminated only when the controlling signal box was closed and indicating that the signal was working automatically. On some later schemes, illuminated "A" signs were provided on both automatic and semi-automatic signals.
 |
 |
|
[9.11] "A" Sign with Signal Identification.
Area: London Marylebone - Neasden, LNER Usage: Low Status: Historical |
[9.12] Illuminated "A" Sign.
Area: LNER / SR Usage: High Status: Historical |
|---|
|
The GWR introduced an experimental form of indicator in 1926, which was intended to replace the "train indicator in box" sign that needed its own separate source of illumination (see [9.4]). The trial indicator comprised a stencil lettered "track", positioned immediately to the right of the signal lamp [9.13], by which it was illuminated in a similar manner perhaps to the Coligny-Welch lamps fitted to some distant signals (see [2.66 - 2.69]). These indicators were not successful. |
|
The LNER had adopted the use of the 'D' sign (see [9.6]) and the diamond sign (see [9.7]) by 1926. Whereas the LMS only fitted 'D' signs to signals to indicate that a call plunger was provided, the LNER also used them to indicate that a telephone was provided. Diamond signs were universally introduced to the LMS, the GWR and the SR in 1929.
In 1928, the LNER installed colour light signals between Eryholme Junction and Black Banks, south of Darlington. The signal identification plates were an unusual shape, having semicircular edges at the top and bottom [9.14]. Each signal was provided with a marker light on its post, continuously lit by an oil lamp, to help drivers locate the signal in the event of the main signal light failing. In the case of automatic signals, the marker light illuminated a black letter "A" on a white circular background [9.15], whereas the marker lights on semi-automatic signals showed a plain white light [9.16]. Semi-automatic signals were also equipped with "A" signs (see [9.12]) that were illuminated only when the signal was working automatically and displaying a red aspect.
 |
 |
 |
|
[9.14] Signal Identification Plate.
Area: LNER Usage: Medium Status: Historical |
[9.15] Illuminated "A" Marker.
Area: LNER Usage: Low Status: Historical |
[9.16] Marker Light / Auxiliary Light.
Area: LNER Usage: Medium Status: Historical |
|---|
|
The only automatic colour light signals on the GWR were situated on the Engine and Carriage lines between London Paddington and Old Oak Common, and each was fitted with a white rectangular plate bearing the letter "A" [9.17]. When the LMS introduced colour light signals on the Watford 'New' Line in 1932/1933, the automatic signals were similarly plated. |
|
The LMS introduced the "T" sign in 1932, to identify signals at which a telephone was provided. The sign comprised a black letter "T" on a white rectangular background [9.18]. By 1936, combined signs had been introduced that superimposed the letter "T" onto a 'D' sign [9.19] or a diamond sign [9.20], succeeding the fitment of separate signs at signals where two signs applied.
 |
 |
 |
|
[9.18] "T" Sign.
Area: LMS (subsequently London Midland, Scottish and Western Regions) Usage: High Status: Historical |
[9.19] Combined 'D' and "T" Sign.
Area: LMS (subsequently London Midland and Scottish Regions) Usage: Medium Status: Historical |
[9.20] Combined Diamond and "T" Sign.
Area: LMS (subsequently London Midland, Scottish and Western Regions) Usage: High Status: Obsolescent |
|---|
The LMS devised illuminated versions of the diamond sign, "D" sign and "T" sign for use in tunnels and on underground railways. In each case, the relevant symbol was printed in red on a white circular background [9.21 - 9.23]. Where a "T" sign was combined with either a diamond sign or a "D" sign, a small black letter "T" was additionally placed in the centre of the sign [9.24 & 9.25].
 |
 |
 |
|
[9.21] Illuminated Diamond Sign.
Area: LMS Usage: Low Status: Historical |
[9.22] Illuminated "D" Sign.
Area: LMS Usage: Low Status: Historical |
[9.23] Illuminated "T" Sign.
Area: LMS Usage: Low Status: Historical |
|---|
 |
 |
|
[9.24] Illuminated Combined Diamond and "T" Sign.
Area: LMS Usage: Low Status: Historical |
[9.25] Illuminated Combined "D" and "T" Sign.
Area: LMS Usage: Low Status: Historical |
|---|
In 1933, the LNER introduced colour light signals between York and Northallerton. In this installation, the marker lights fitted to semi-automatic and controlled signals each comprised an electrically lit white light, termed an 'auxiliary light' (see [9.16]). The auxiliary light was only illuminated if the main aspect had failed. Semi-automatic signals had both an illuminated "A" sign (see [9.12]) and an auxiliary light, the latter being provided for use when the signal was not working automatically. The junction signals on this scheme had separate signal heads for each route (see [6.24]) and so did not require to be fitted with auxiliary lights.
|
|