
|

|
|
|
British signalling practice through the years has almost exclusively been based on 'route signalling' principles. Route signalling informs drivers approaching a junction of which route their train will take, enabling them to regulate their speed accordingly. Any main signal (see Section 2) that can route towards more than one destination will, when cleared, provide the driver with an indication of which route is set. This may be done in combination with other measures to form a complete junction signalling arrangement. Because shunting movements are made at low speed, it is not always necessary to give an indication of route when a shunting signal (see Section 4) that can route towards more than one destination is cleared.
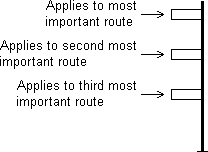
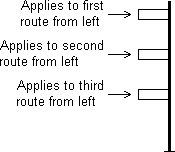
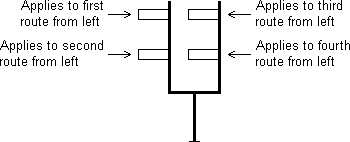
Routeing information was originally conveyed by providing a separate signal for each route and placing them one above the other on one post. The signal for the main line was placed at the top of the post, with the other signals placed below in descending order of importance [6.1]. That arrangement was fine from the point of view of an express train driver, who knew that the top signal was the one that applied, but for drivers of other trains it could be confusing. The practice was altered such that the uppermost signal applied to the line on the extreme left, regardless of its importance. The second signal from the top applied to the next line in order from the left and so on [6.2].
 |
 |
|
[6.1] Semaphore Junction Signal. *
Area: All Areas Usage: Unknown Status: Historical |
[6.2] Semaphore Junction Signal. *
Area: All Areas Usage: High Status: Obsolescent |
|---|
| * Note: | The illustrations above serve only to show the positions of the signal arms, which are described in Section 2. |
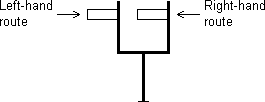
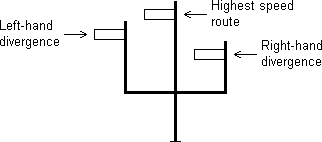
The Board of Trade favoured the arrangement described above, but from the early 1860s the preferred arrangement for high-speed running was to place the signals side by side in an order corresponding to the direction of each route [6.3]. In some early installations, the arms of junction signals were mounted on separate posts placed on opposite sides of the railway. The relative importance of each route can be conveyed by stepping the signals in height if they apply to routes that differ in speed. The highest signal applies to the fastest route, and subsequent signals on either side are progressively lower [6.4].
 |
 |
|
[6.3] Semaphore Junction Signal. *
Area: All Areas Usage: High Status: Current |
[6.4] Semaphore Junction Signal. *

Area: All Areas Usage: High Status: Current |
|---|
| * Note: | The illustrations above serve only to show the positions of the signal arms, which are described in Section 2. |
Exceptionally, a junction signal comprised a combination of arms stacked one above the other and placed side by side [6.5]. This arrangement was typically used on the approach to a large station where many signal arms were required.
 |
|
[6.5] Semaphore Junction Signal. *
Area: All Areas Usage: Medium Status: Historical |
|---|
| * Note: | The illustration above serves only to show the positions of the signal arms, which are described in Section 2. |
The distant signal on the approach to a diverging junction might also have a separate arm for each route. These were termed 'splitting distant' signals, and their distant arms were arranged in the same configuration as the stop arms of the junction signal. For example, if a splitting distant signal was provided on approach to the junction signal shown in [6.4], its appearance would be as shown in [6.6]. Exceptionally, distant arms could be placed one above the other on the same post [6.7]. The provision of splitting distant signals was at one time a requirement of the Board of Trade. On 17 September 1912, a derailment occurred on a diverging junction at Ditton (London & North Western Railway). The splitting distant signal was 'off' for the diverging route, but the driver had mistaken it for the straight route's distant and took the junction at too high a speed. As a result of this accident, from 1914 the BoT required that splitting distants should only be provided in exceptional circumstances. The last semaphore splitting distant signal, at Larbert Junction (Scotland Route), was abolished in May 2007.
 |
 |
|
[6.6] Semaphore Splitting Distant Signal. *
Area: All Areas Usage: High Status: Historical |
[6.7] Semaphore Splitting Distant Signal. *
Area: Various Usage: Low Status: Historical |
|---|
| * Note: | The illustrations above serve only to show the positions of the signal arms, which are described in Section 2. |
If other stop signals intervened between the distant signal and the junction signal, then those signals might also be given separate stop arms to repeat the routeing information. This practice was relatively prevalent on the Great Western Railway and the London & North Western Railway.
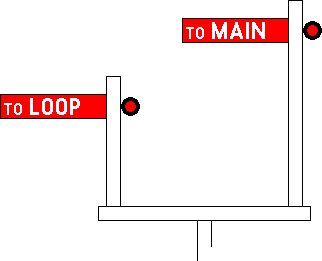
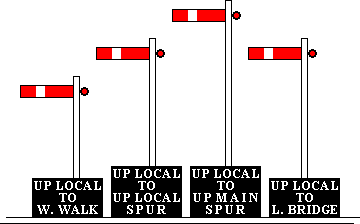
It was quite common in the early years for junction signals to have 'indexed' arms. These had the signal applications written directly on the front of each signal arm [6.8]. This was sometimes done temporarily to assist drivers with learning new signals. As an alternative to indexed arms, the signal applications could be exhibited on boards below each arm [6.9].
 |
 |
|
[6.8] Semaphore Junction Signal with Indexed Arms.
Area: All Areas Usage: High Status: Historical |
[6.9] Semaphore Junction Signal with Description Boards.
Area: All Areas Usage: High Status: Historical |
|---|
|
Splitting distant signals could also be fitted with indexed arms [6.10]. |
|
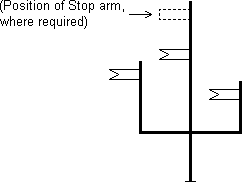
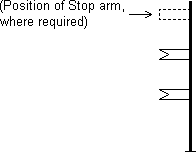
Shunting signals with routes towards more than one destination frequently had no provision for presenting the driver with an indication of which route the signal was cleared for. The same signal could therefore apply to a number of different routes. Where route indications were necessary, separate signals could be placed side by side (and stepped in height, where appropriate) [6.11] or stacked one above the other [6.12]. The choice generally depended on the form of signal used or the space available on site. Very occasionally, shunting signals were indexed [6.13].
 |
 |
 |
|
[6.11] Shunting Signals side by side (e.g. stepped).
Area: All Areas Usage: High Status: Obsolescent |
[6.12] Shunting Signals stacked one above the other.
Area: All Areas Usage: High Status: Current |
[6.13] Indexed Shunting Signals.
Area: Various Usage: Unknown Status: Historical |
|---|
|
|
